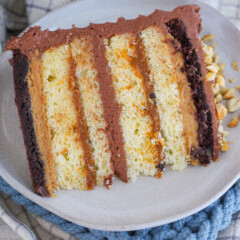
Inspired by the new Choco Smash Cake at Disneyland California Adventure, my copycat version is filled with brownie, peanut butter filling, vanilla cake, dulce de leche, chocolate crisp pearls, and chocolate buttercream.

What is a Choco Smash Cake?
The Choco Smash Cake is the new dessert offered in Disney California Adventure Park at Pym Test Kitchen. Previously, Pym Test Kitchen offered a Choco Smash Candy Bar, but it was recently replaced by this new cake version of the candy bar.
This multi-layered cake is made up of layers of brownie, white chocolate peanut butter ganache, chocolate crunch pearls, white cake, dark chocolate truffle mousse, and white chocolate caramel bavarian cream, coated in chocolate ganache and topped with roasted peanuts.
Here’s a look at the real deal:

A mouth full, right?!
After learning about this cake from a friend, and seeing it has so many of my favorite things in it, I knew I had to try it during our recent visit to Disneyland with the kids.
My Review of the Choco Smash Cake
To be honest, I can only give this one a 6/10. I actually had no idea there was white chocolate in any of the elements until I was researching it when I got home from the trip. The white chocolate got lost in the mix of peanut butter and caramel, but was also the reason the fillings lacked a lot of flavor. The cake itself was a little dry and I don’t even think it needed the ganache on the outside. I would have preferred more of the chocolate mousse.
But here’s the thing… Disney is making food and treats for a crazy amount of people each day. It’s hard to land everything perfectly fresh and flavorful when there are so many factors of food prep and food rules involved. So, taking that into consideration, they did a good job. I just knew this cake had so much potential and I knew I wanted to make my own version.
MORE DISNEY FOOD RECOMMENDATIONS
For a full Disneyland food review, be sure to check out MY INSTAGRAM REEL about everything we ate in a day at Disneyland and California Adventure. I’m telling you about all the things to get and what to skip!
Copycat Choco Smash Cake
For my Copycat Choco Smash Cake, we’re using the original as major inspiration. The main difference in my Choco Smash Cake recipe is you won’t find any white chocolate. I played around with a few options (caramelizing white chocolate, making a ganache, etc.) and ultimately felt like the caramel flavor was getting lost among all the other elements. Instead, you’ll see we’re using dulce de leche – straight from the can.
The other thing I wanted to point out – you can use your favorite box brownie mix (mine is the Ghirardelli Dark Chocolate Brownie Mix) OR my homemade version of my favorite boxed brownie. You’ll find that recipe HERE. To simplify, I used the box mix for my cake.

Elements in the Choco Smash Cake
- Brownie
- Peanut Butter Filling
- Vanilla Cake
- Dulce de Leche
- Chocolate Crisp Pearls (another option are these Valrhona chocolate and caramel combination crisps.)
- Chocolate Buttercream

As you can see from the pictures, I switched up my layering just a bit. I wanted to make sure the peanut butter and caramel elements didn’t blend. For me, I love when I can distinctly taste each element of a cake, without anything overpowering another element.
Brownie Layer
As I mentioned earlier, you can make the brownie layers from a box or from my homemade recipe for my copycat Choco Smash Cake. Either way, you’re going to split the brownie batter between two 8-inch round cake pans. I use the same Fat Daddio cake pans for the brownie element as I do my cake. Once the brownie layers are baked, you’ll let them cool a bit and then turn them onto a cooling rack to cool completely.
TIP: when you line the bottom of the cake pans in preparation to bake the brownies, it’s helpful to have some of the parchment come up the sides. This allows you to pull the brownies up, out of the pan. I’ve noticed that if I just use parchment on the bottom of the pan, I struggle to get the brownies out when I flip the pan over.

How to Make Moist Vanilla Cake Layers
These cake layers are really easy to whip up, but can easily be a “Pinterest fail” if you forget to follow these steps for making moist cake layers from scratch:
- Use real butter
- Measure ingredients correctly
- Use room temperature butter
- Add fat
- Use light metal pans
- Mix on high at the beginning (with butter, sugar, oil and eggs)
- Mix on low at the end (when you add flour)
- Don’t overbake
For more details on these tips, be sure to read my blog post about How to Bake Moist Cakes from Scratch.

Chocolate Buttercream Recipe
The goal for your chocolate buttercream should be a smooth, silky, easily spreadable consistency. It’s this amazing consistency that makes smoothing out your chocolate buttercream while decorating so much easier. Compared to other chocolate buttercream recipes I’ve tried, this is the smoothest and tastiest one around.
To make this chocolate buttercream recipe, you’ll start by heating the dark chocolate with the heavy whipping cream until you’ve created a smooth chocolate ganache. Let it cool to room temperature while you sift the powdered sugar.
The next step is to beat the butter on it’s own for just a bit to soften it up. While the butter is mixing, add the chocolate ganache, followed by the powdered sugar, vanilla and salt.
The color of the chocolate buttercream lightens a bit while you mix it. As it rests, it will darken.
This buttercream is the perfect finishing touch to my Copycat Choco Smash Cake.
FAQs
Yes, this cake can be made and fully assembled ahead of time. Once you’ve decorated the cake, place it in the freezer for about 30 minutes. This will set the buttercream so you can then remove it from the freezer, cover it in plastic wrap, and place it back in the freezer. About 6 to 8 hours before you want to serve the cake, remove it from the freezer and let it sit at room temperature.
If you can’t find dulce de leche or don’t want to use it, you can make a homemade caramel sauce, use a store bought caramel sauce, or you can make a caramel ganache with caramel baking chips and heavy whipping cream.
For sure! Here’s what I would do if I were making this a sheet cake.
1. Bake the brownies in a 9×13-inch rectangular pan. Let them cool and don’t flip them out of the pan.
2. In another 9×13-inch pan, I would bake the cake (which will take about 5ish minutes longer to bake in the rectangular pan than the two 8-inch pans). Once the cake has cooled for about 15 minutes, invert it onto a wire rack to cool completely. You’ll then divide the cake in half horizontally so you have two layers.
3. To assemble, you’ll add all of the peanut butter filling over the brownie layer. Then carefully place one of the cake layers of top of the peanut butter layer. Cover it with dulce de leche and the chocolate crisp pearls. Add the second cake layer on top of the dulce de leche filling and top the cake with the chocolate buttercream and chopped peanuts.
Choco Smash Cake
Ingredients
Brownies
- 1 box Dark Chocolate Ghirardelli Brownie Mix
- OR
- 1 batch Homemade brownies, my favorite recipe
Vanilla Cake
- 3 cups (345 g) cake flour
- 2 teaspoons 8 g baking powder
- 1 teaspoon 6 g salt
- 1 cup (226 g) unsalted butter, room temperature
- 1 3/4 cups (350 g) granulated sugar
- 1/3 cup (72.6 g) vegetable oil
- 4 eggs, room temperature
- 1 1/4 cup (300 g) buttermilk, room temperature
- 1 tablespoon (12 g) vanilla extract
Filling
- 1 13.4 oz dulce de leche
- 1/2 cup Chocolate Crisp Pearls, this is the brand I use
For the Peanut Butter Filling
- 1 cup 230 g heavy whipping cream
- 1/2 cup (62.5 g) powdered sugar
- 1 teaspoon (4.2 g) vanilla extract
- 1 cup (250 g) peanut butter smooth
For the Chocolate Buttercream
- 1/3 cup (77 g) heavy whipping cream
- 10 oz. dark or semi-sweet chocolate chips
- 2 cups (452 g) unsalted butter, slightly chilled
- 5 cups (625 g) powdered sugar, measured then sifted
- 1 teaspoon (4.2 g) pure vanilla extract
- Pinch of salt
For the Garnish
- salted roasted peanuts
Instructions
For the Brownies
- Follow the instructions on the box, except you'll bake the brownies in two 8-inch round cake pans for 20 minutes. See note above in the blog post for prepping your pans.
- Allow to cool completely before using.
For the Cake
- Preheat the oven to 325 degrees F. Prepare two 8-inch cake pans with non-stick spray, parchment paper on the bottom of the pan, and another coat of spray. Set aside.
- In a medium size bowl, whisk together the cake flour, baking powder and salt. Set aside.
- In the bowl of a stand mixer fitted with the paddle attachment, beat the butter, oil, and sugar on high until fluffy and smooth, about 3 minutes.
- Add the eggs, one at a time to the bowl, making sure to scrape down the sides and bottom of the bowl between additions. Add the vanilla. Continue to beat on medium-high speed for an additional two minutes. The mixture should be smooth and fluffy.
- Turn the mixer on low and alternately add the flour mixture and the buttermilk, starting and finishing with the flour mixture. Mix until just incorporated.
- Scrape down the sides of the bowl and mix on low for another 30 seconds.
- Evenly distribute the cake batter among the two 8-inch pans and bake for about 35 minutes, or until toothpick comes out with just a few moist crumbs on it.
- Remove cakes from the oven and let cool in pans for 15 minutes before inverting onto cooling racks.
- When cakes are completely cooled, divide the layers in half horizontally using a serrated knife of cake leveler. You’ll have four thin cake layers. Wrap the cakes (2 layers can be wrapped together like a full cake layer), and freeze for at least an hour before stacking. The cake layers are easier to handle, assemble and frost when they are chilled.
- You can also freeze the cake layers for several days. Just be sure to let them thaw for about 30-60 minutes before using.
For the Peanut Butter Filling
- In a stainless steel bowl, beat the heavy whipping cream, powdered sugar, and vanilla on medium-high speed until still peaks form.
- Fold the peanut butter into the whipped cream.
- I like using this right away (so you can make it when you're ready to assemble your cake), but you can also make it ahead of time and refrigerate until ready to use.
For the Buttercream
- In a microwave safe bowl, heat the chocolate chips and the cream for about one minute. Stir until mixture is smooth. Allow to cool slightly.
- In the bowl of a stand mixer fitted with the paddle attachment, beat the butter for about 2 minutes on medium-high speed.
- With the mixer on low speed, add the cooled ganache. Scrape down the sides and bottom of the bowl and then mix on medium-high speed for about a minute, until the mixture is smooth.
- Gradually add the powdered sugar, one cup at a time, followed by the vanilla and salt.
- Buttercream can be store in an airtight container in the refrigerator for a week.
- When you’re ready to frost the cake, bring the frosting back to room temperature and mix by hand with a wooden spoon to push out all of the air pockets.
Assembly
- Place one brownie layer on a cake board or cake stand. Evenly spread half of the peanut butter filling over the brownie layer.
- Place the first cake layer, top side up, on the peanut butter filling. Cover the cake with half of the dulce de leche. Sprinkle on the chocolate crisp pearls and gently pat into place.
- Place the second cake layer on top of the filling.
- Evenly spread 1 cup of the chocolate buttercream on top of the cake and then top with the third cake layer.
- On the third cake layer, evenly spread the rest of the dulce de leche and more chocolate crisp pearls.
- Place the fourth cake layer on top and cover with the remaining peanut butter filling.
- Finish stacking the cake by placing the second brownie layer on top of the peanut butter filling.
- Cover the entire cake with a thin layer of buttercream. Freeze the cake for 10 to 15 minutes to set the crumb coat.
- Once the crumb coat is set, finish frosting the cake with the remaining buttercream.
Is there another filling besides the peanut butter? My daughter is allergic.
This was a showstopper in the visual sense and the taste. Followed the recipe and the tips exactly. I made the cake and brownie layers a few days ahead and froze them. Made the frosting and the peanut butter filling on the day of assemby while the frozen layers thawed a bit. Flawless. Thank you for making me look like an expert again!
Oh my gosh. Made this as a 9×13. Everyone flipped out over this cake! Everything just works so well together! The crispy chocolate pearls were a huge hit. Great recipe! Thanks.
Another hit! Made it as a 9×13 and it was perfect and so easy. My family said it reminded them of the whatchamacallit candy bar!
I’m making this cake for tomorrow and I just made your homemade brownie recipe. These brownies are freaking delicious! I cannot stop eating them, So much better than a box mix!