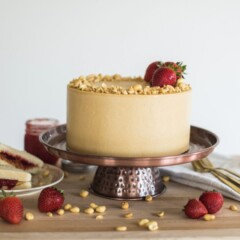
Peanut Butter and Jelly Cake – Peanut butter cake layers with homemade strawberry jam and peanut butter frosting.

Peanut Butter Obsession
By now, you probably know my deep love for peanut butter. Correction – obsession for peanut butter would be more accurate! I could eat it with just about anything. Once, I even had it on a burger at Lucky 13 in Salt Lake. And it was so good!

One of my favorite ways to enjoy peanut butter is in a traditional peanut butter and jelly sandwich. My go-to method is with smooth Skippy peanut butter, strawberry jam and white bread. Hmmm. (I’m having flashbacks to my childhood just thinking about it). I never get tired of a PB&J sandwich! So, turning it into a cake was the obvious next move for me.

Peanut Butter and Jelly Cake
A couple years ago, I tried a couple peanut butter cake recipes, but wasn’t impressed with them. The recipes I tested came out dry and didn’t have enough peanut butter flavor. I decided to come up with my own recipe by combining ideas from others and adding a few things of my own. I’m so pleased with how the cake layers came out!

To make sure the cake layers came out tender, I used cake flour. From the other recipes I tried, I noticed that all-purpose flour with the peanut butter created a cake that was too dense. In my recipe, I also use buttermilk, a generous serving of peanut butter and a teaspoon of cinnamon! Oh man! That cinnamon is a game changer. It’s just a hint but I think makes the cake what it is.

The cake is also moist with the perfect peanut butter flavor.

Peanut Butter Buttercream
For the filling, I use my mom’s homemade strawberry jam. There’s nothing else like it, if you ask me. If you don’t have homemade jam on hand, don’t worry. Your favorite store bought jam will work great too.

For my peanut butter frosting, I adapted one I already use and love from Annie Eats. Instead of whipping the cream and folding it in at the end, I just added a little cream at the end and whipped the frosting mixture like I usually do. It’s still creamy and smooth, and just as delicious – it just has a little more stability to it.

One bite of this cake and I think you’ll agree, it’s definitely a peanut butter and jelly sandwich in cake form! What could be better than that? Look at these layers!


I can’t wait for you to try it out! If you love peanut butter, you’re going to go nuts for this cake!

And here’s a quick look at how to assembly this cake:
Similar Recipes You’ll Love
Peanut Butter and Jelly Cake
Ingredients
FOR THE CAKE
- 3 cups (345 g ) cake flour
- 3 teaspoons (12 g) baking powder
- 1 teaspoon (5.6 g) coarse salt
- 1 teaspoon (2.6 g) cinnamon
- 1 cup (226 g) unsalted butter at room temperature
- 1 cup (250 g) peanut butter
- 2 cups (400) g granulated sugar
- 4 eggs at room temperature
- 1 cup (240 g) buttermilk at room temperature
- 1 tablespoon (13 g) vanilla extract
FOR THE BUTTERCREAM
- 5 cups (625 g) powdered sugar, measured and then sifted
- 1 1/2 cups (339 g) unsalted butter, slightly chilled
- 1 cup (250 g) creamy peanut butter
- 1 tablespoon (13 g) pure vanilla extract
- 1/4 cup (57.75 g) heavy whipping cream
- Pinch of coarse salt
- *This buttercream recipe makes enough to fill and cover your cake. If you want to add additional piping you’ll want to make an extra 1/2 batch.
Extras
- Seedless strawberry jam
- Lightly salted peanuts optional
Instructions
FOR THE CAKE
- Preheat oven to 325 degrees F. Spray three 8-inch or four 6-inch pans with nonstick spray, line the bottoms with parchment paper and spray again. Set aside.
- Sift together the flour, baking powder, salt, and cinnamon. Set aside.
- In the bowl of an electric mixer fitted with a paddle attachment, mix together the butter and peanut butter until creamy. Add in the sugar and mix on medium for about 3 minutes.
- Decrease the speed to low and add in the vanilla and eggs, one at a time. Stop the mixer and scrape down the sides and bottom of the bowl.
- With the mixer on low, add in half of the flour mixture, then stream in the buttermilk and mix until incorporated. Add in the remaining flour and mix until combined.
- Evenly divide the batter between the cake pans and bake for about 30 to 35 minutes or until a toothpick inserted in the center of the cakes comes out clean. Cool on a wire rack for 10-15 minutes before removing the cakes from their pans.
FOR THE BUTTERCREAM
- In the bowl of electric mixer fitted with the paddle attachment, combine the butter and peanut butter. Beat on medium-high speed until smooth, about 45 seconds.
- Add the powdered sugar to the bowl and mix in, slowly at first until incorporated, then increasing the mixer speed to high. Blend in the vanilla extract, salt and heavy whipping cream, and continue to whip on high speed until very fluffy, about 4-5 minutes, scraping down the sides of the bowl as needed.
- To remove air bubbles from the frosting, use a wooden spoon to stir and push out the air bubbles.
ASSEMBLY
- Place your first layer on the cake board. Spread about 1/2 cup of peanut butter frosting on the cake and then pipe a border of the peanut butter frosting around the edge to create a wall for the jam. Fill the center with about 1/2 cup strawberry jam and carefully spread it around. Don’t add too much jam or the cake will be unstable as you continue to stack and frost.
- Place the second layer of cake on top of the first layer and repeat step one.
- Place the third layer of cake, bottom side up, on the second layer and spread a thin layer of frosting around the entire cake to create a crumb coat. Freeze the cake for 10 to 15 to set the crumb coat.
- After the crumb coat is set, continue to frost the cake with the remaining frosting.
- If you use a cake board on top of the cake like I did in my video above, you’ll want to freeze the cake again for another 20 to 30 minutes after you’ve frosted the sides and before you take the cake board off the top. This will ensure you get sharp edges when you cut it off with a knife. You’ll then add frosting to the top of the cake after you’ve removed the cake board.
If I want to do this as cupcakes how long do I bake? Do they need to be completely cool down to fill the jelly?
About 20 minutes but keep an eye on them. And yes let them cool!
I would like to use mini 5 in spring foam pans for my grandson birthday will this work and how many will I need?
Also can I make this 2 day ahead ?
Thank you
I would cut the recipe in half and use 3 5-inch pans. Yes, you can make it in advance.
Wow! This cake was a huge hit and is delicious! The batter itself isn’t too sweet or overwhelmingly peanut buttery and when combined with the sweetness of both the jam and frosting, it was a perfect balance. I also made a smaller version, omitted the jelly and added chocolate frosting for a Funnybone effect. Easy to follow directions and a good cake for an intermediate baker.
My cake came out very dry, almost powdery, but other than that it was fantastic. How can I fix this?
Sorry to hear that. It could have been from a couple things: over baking or even a dry climate. If you make it again, you could reduce the baking time a little and/or add a little extra liquid (about 1/4 cup buttermilk could help).
Could I do this recipe in 2 9inch pans?
Yes